Test (required) & Launch Site
Why is doing test registrations important?
We strongly advise a thorough review and testing phase prior to public release of the registration link. While adjustments are possible post-registration, altering time slots will present a significant logistical challenge.
You can copy and share the link to other people in your organization to test for you as well. We also suggest sending it to someone who is not very tech savvy to see if they have any trouble registering. This is a sure fire way to get to the bottom of a problem before you go live, as sometimes it can be hard to spot problems or errors from the admin side after just building the site yourself. An outside perspective gives a better idea of what is wrong with your site.
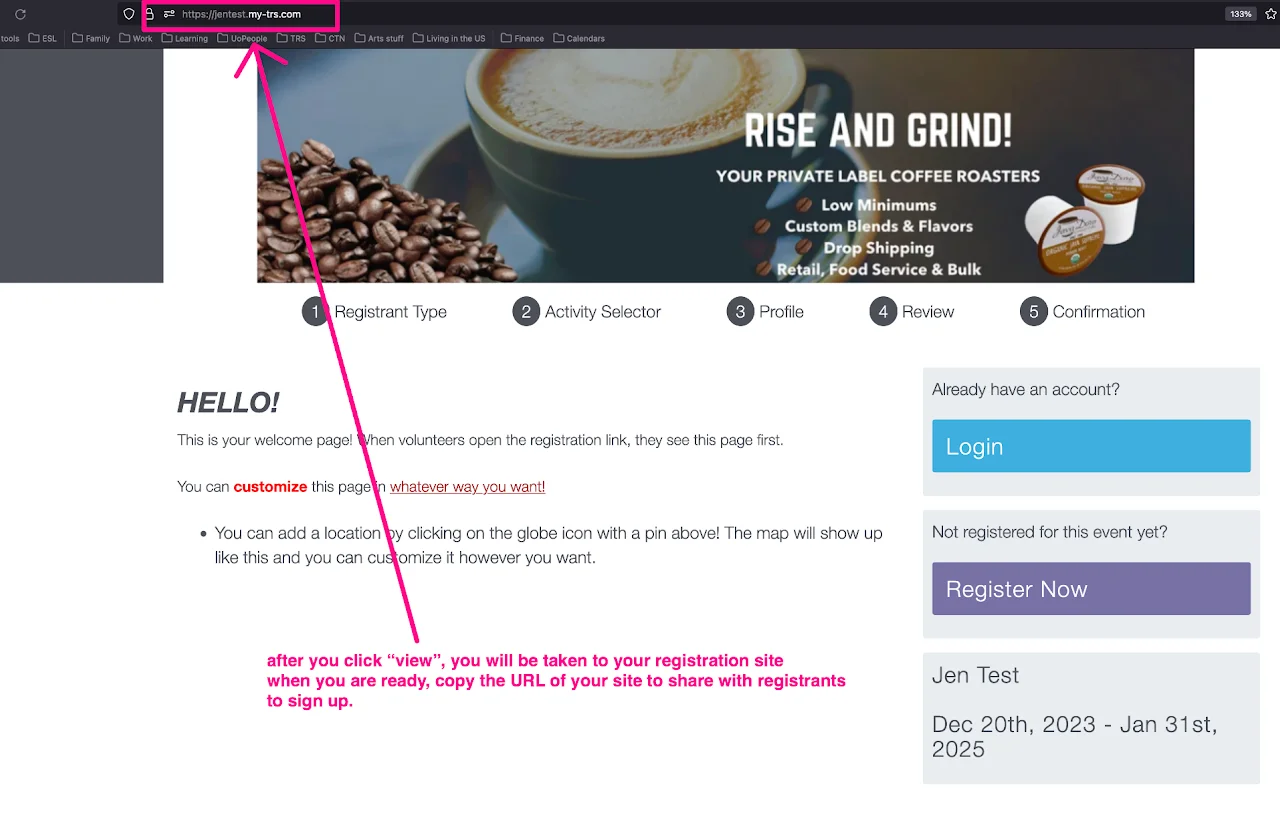
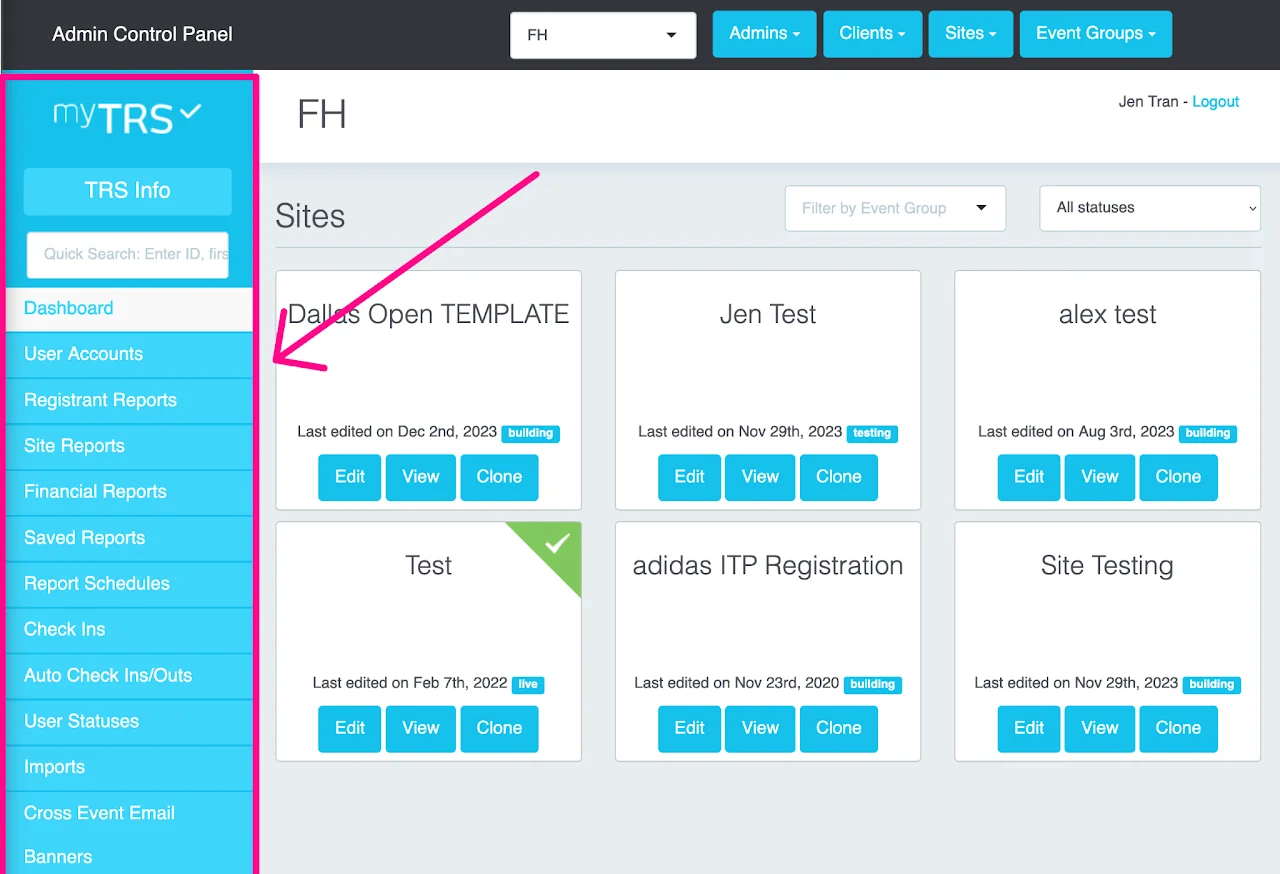
Where can I find the site's link to test?
Before Testing: Make sure that your Registration End Date is a date in the future so the site is open for registrations.
Get the site's link to test
To get the site's link follow one of the paths shown in the two screen shots below:
Visit on the top left corner inside your site editor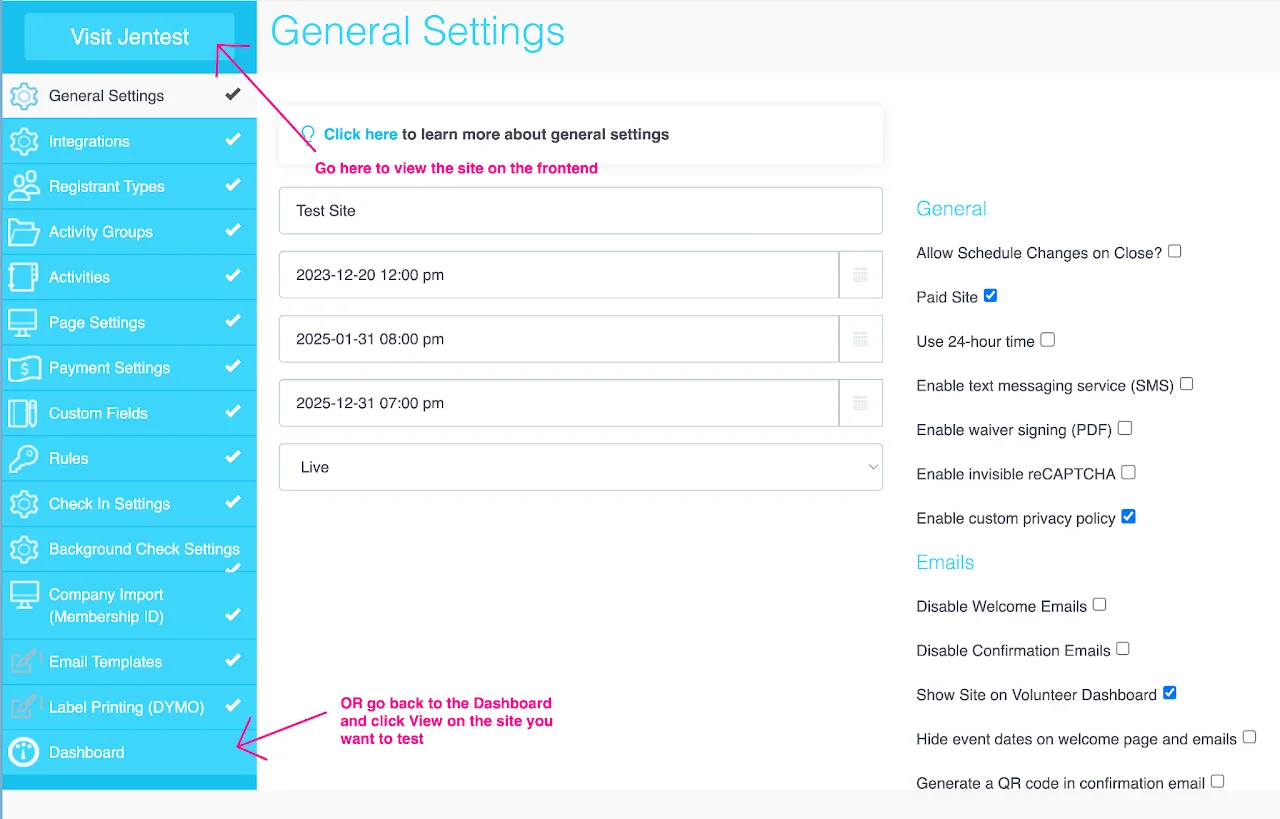
Dashboard and click View on the site youwant to test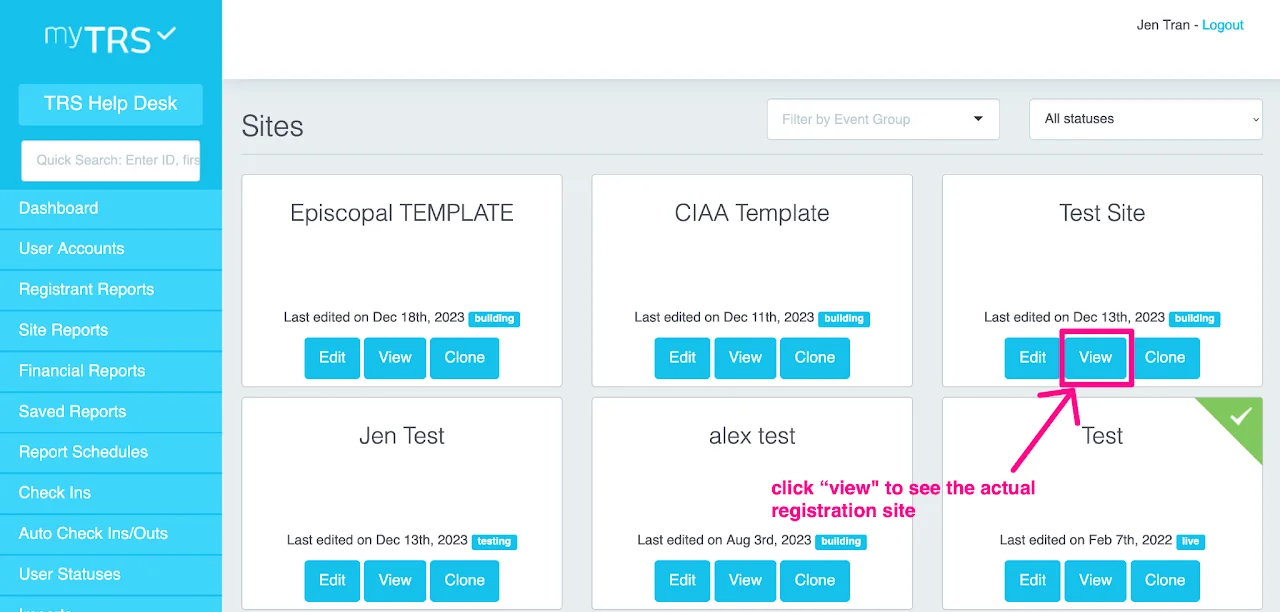
Is this the site that my registrants will see?
Yes. Every site created for TRS clients is technically already live and it is the site that registrants will see. The only difference is that registrants do not know the link/URL so they won't go in and register until you share the link with them. Simply share the registration link with the registrants when you are ready to accept registrations.
What to check during testing process?
Here are some important items that need to be checked along the way.
Page 1: Welcome page
Begin the process by visiting your site to sign up as a volunteer. Instantly you should be greeted by your Welcome Page.
- Check the wording and dates on this page.
- Is the information clear and correct? Are there any typos?
This is the first thing your registrants/volunteers will see, and you want to make sure that right out the gate, everything is correct and welcoming.
Page 2: Registrant Types
If your site provides multiple reg types, test the system by going through each registrant type. Can registrants/volunteers access the correct registrant types with any access codes set up? We recommend keeping a spreadsheet of the access codes if you have several of them. This makes it easier to send to other admins.
Page 3: Activity Selector
Check all activities, capacities, dates/times, and descriptions.
- Are they easy to follow?
- Are the activities visible to appropriate volunteers?
- Can hidden activities be accessed with the correct codes?
- Are there any buttons on the Activity Selector page that should be rephrased or removed for easier navigation?
- If you've set rules in place, see if you can break the rules to make sure they were set appropriately
If you set a minimum requirement of 2 time slots, but a max of 3, make sure you can't get past this step by only selecting 1 time or choosing too many such as 4
- If group registration was enabled, go through the group registration process at least once to see what your volunteers will encounter and to confirm you do not need to add more instructions.
Page 4 & 5: Profile Questions & Waiver
- Are the custom field questions easy to follow?
- Are profile questions shown correctly based on registrant types and activities?
- Are the required questions required*?
- Is the Terms & Conditions title clear? Can you easily follow the instruction to sign the waiver and continue?
Page 5: Payment
If you have a paid site, confirm transactions are going through by testing with a test activity set at. DO NOT go live without testing credit card transactions. Do a test transaction using a small amount of money (e.g: $1) to see if your transaction went through.
What email should I use for test registrations?
If you are testing the first time, use your actual email to sign up for a user account. If you are testing the 2nd, 3rd, 4th, etc. time, there are two options:
You can sign in to the previous user account you created using the same email address
✅ Pros: you don't have to fill in the profile questions again
❌ Cons: you can't test as a different registrant type and you can't see the Terms & Conditions (because you already signed it last time)
You can sign up as a new user simply by adding +1, +2, +3 before @ in your email (e.g: jentran+1@my-trs.com)
✅ Pros: you can sign up and test as a new registrant type & see the Terms & Conditions again
❌ Cons: you have to fill in the profile questions again.
It is up to you to decide whether to sign in or sign up based on what you want to test each time.
How to Test and Edit site simultaneously
Check out the video above to learn how to:
- View your site live
- Navigate the backend to reflect changes on the frontend
- Do test registrations
- Delete test registrations
How can I remove test registrations?
Before getting started: Make sure you can locate the Registrant Reports and User Accounts sections from your TRS Dashboard.
Removing Test Registrations
There are two ways to remove test registrations:
Cancel the registrations (but keep user account)
Cancelling registrations will remove all the schedules you signed up on the site. However, your user account will still be in the system which means you can use it to sign in and register again.
Watch the video above and/or follow the steps below to cancel registrations:
- From your myTRS Admin Dashboard, go to
Registrant Reports - Click
ViewonRegistration Report - Select the site
- Click on the
Runbutton - Select the registrations you want to remove
- Click
Cancel All Shifts
Delete user account (all registration records will also be removed)
Deleting User Account will remove all of your registration records. That means, if you completed registrations on several sites, all of those registration records will also be removed from the system. That means you won't be able to find what you signed up for before. When you come back to test, you will sign up as a new user instead of logging in.
- From your myTRS Admin Dashboard, go to
User Accounts - In the search bar, type in your last name
- Click
Search - Click
Deletenext to your user account
Launch Site/Go Live!
There is no magic button we press to launch or make your site live. It is "live" from the moment it was created. As soon as you copy and share your registration link to the public, people can start registering.If your site building has not been completely built and fully tested, do not share the site's URL.
Internal reference for site status
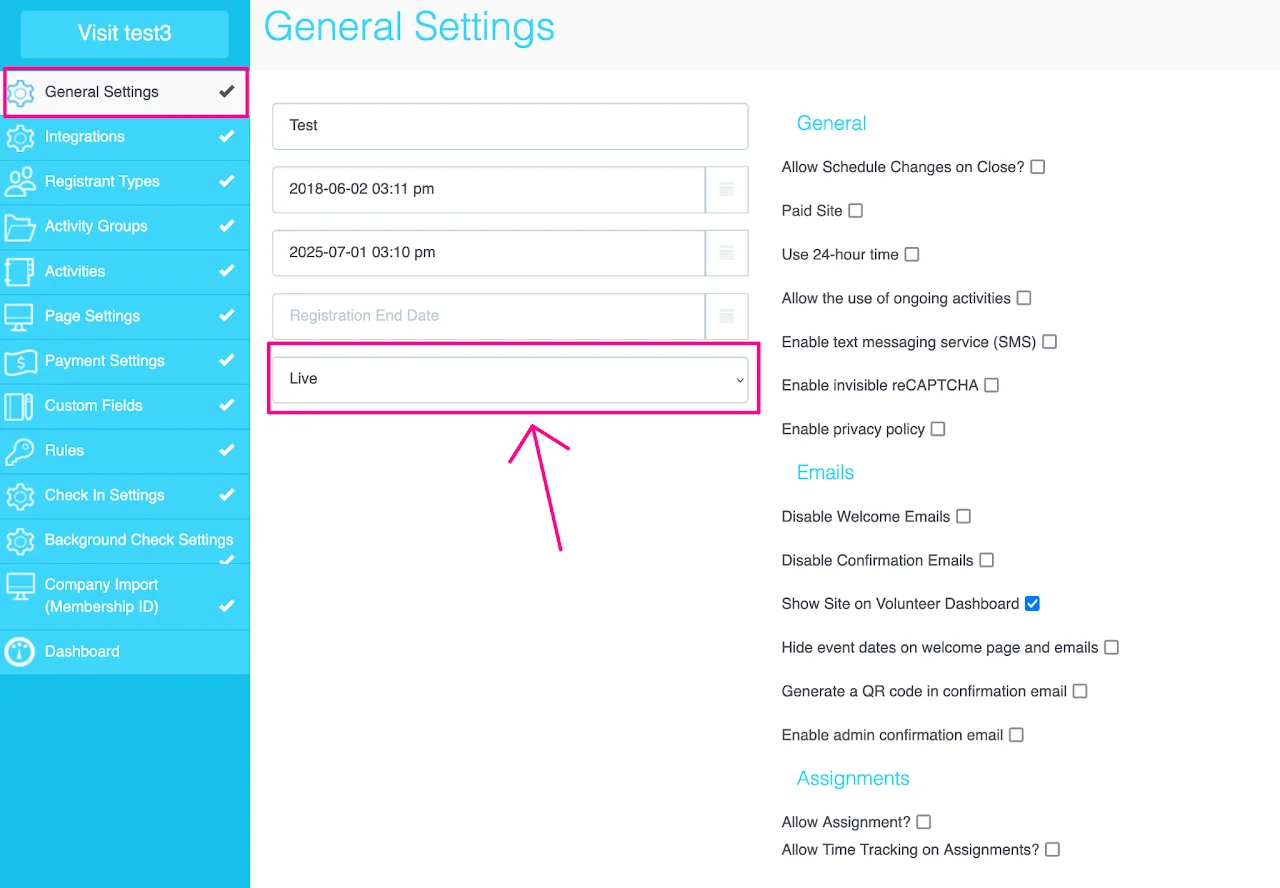
Choose the drop down in General Settings and change your site status to "live." This is ONLY for internal reference. It doesn't actually do anything except to inform your team and TRS that your site is starting to accept registrations.
Share the Site with your registrants:
- Emailing previous or newly expected registrants
- Posting the link on your website, or creating a tab specific for the registration site for quick access
- Sharing via social media outlets and other communication channels as needed
You are officially "LIVE." Congratulations on building your site, and good luck with your event!
Someone registered before you're ready to go live?
Go to Edit on your site > Page Settings tab > Welcome Page tab > Check the box "Hide Register Now Button" > Save the change. When you are ready to go live again, uncheck the box.
How to allow select registrants to sign up after registration is closed?
If you want to allow specific individuals to register after the general registration period has ended—without reopening registration to the public—you can use an access code. This lets you control who can register while allowing them to complete the process on their own.
Follow the steps below to set this up:
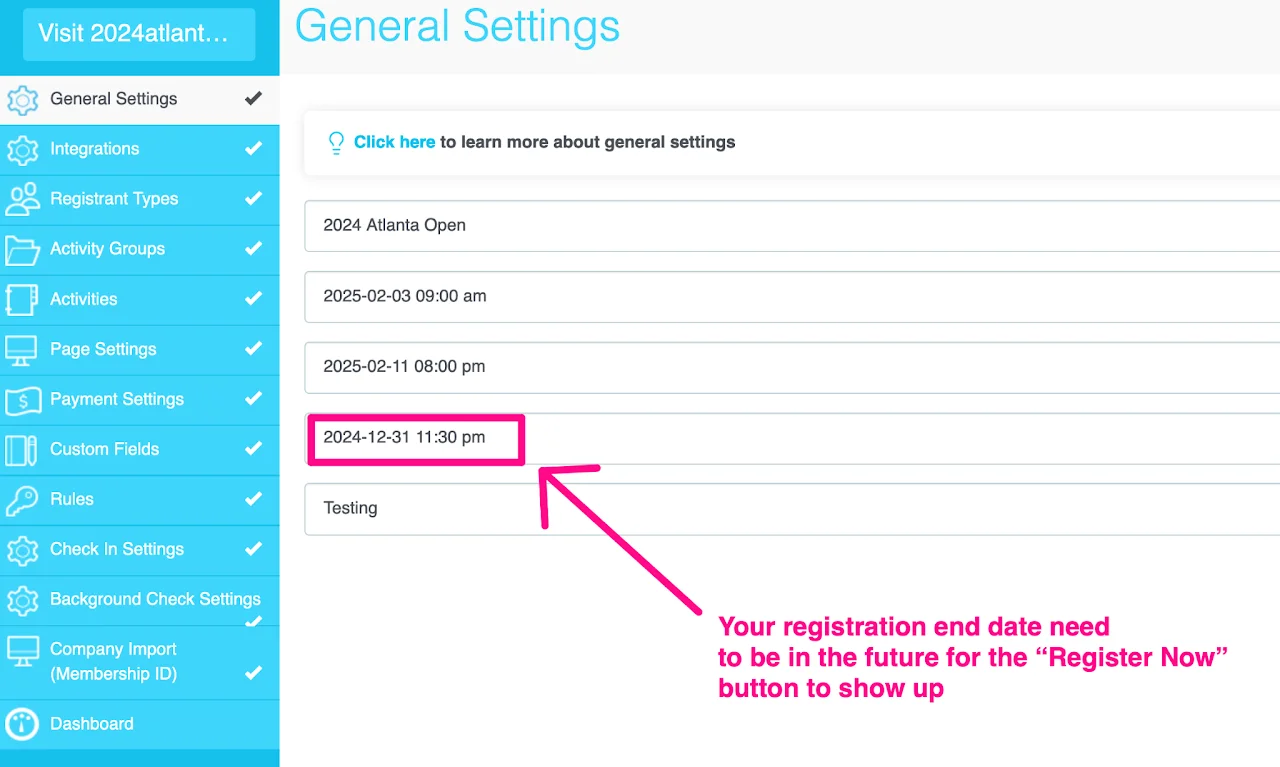
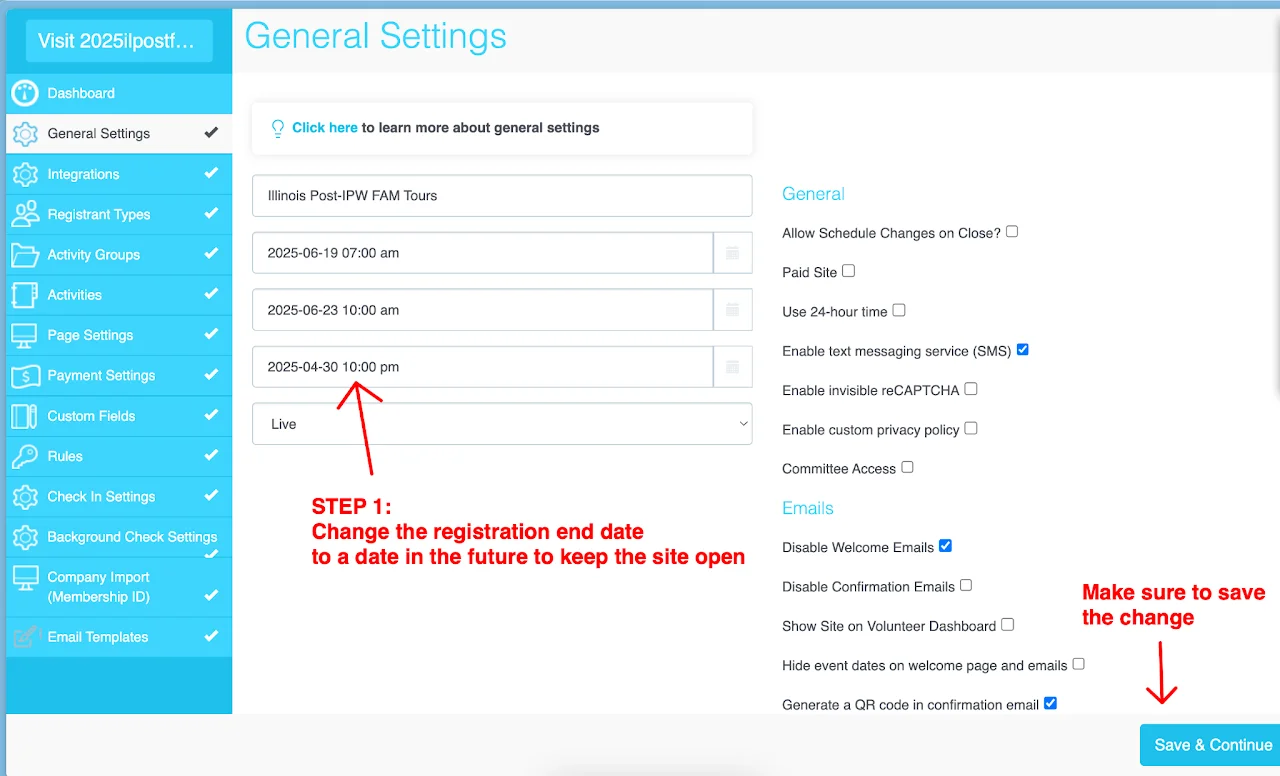
STEP 1: Extend the registration end date
The system won't accept new registrations if the registration end date has passed.
- Go to
Editon your site card - Go to
General Settings - Select a new registration end date (click on the date > click on the time)
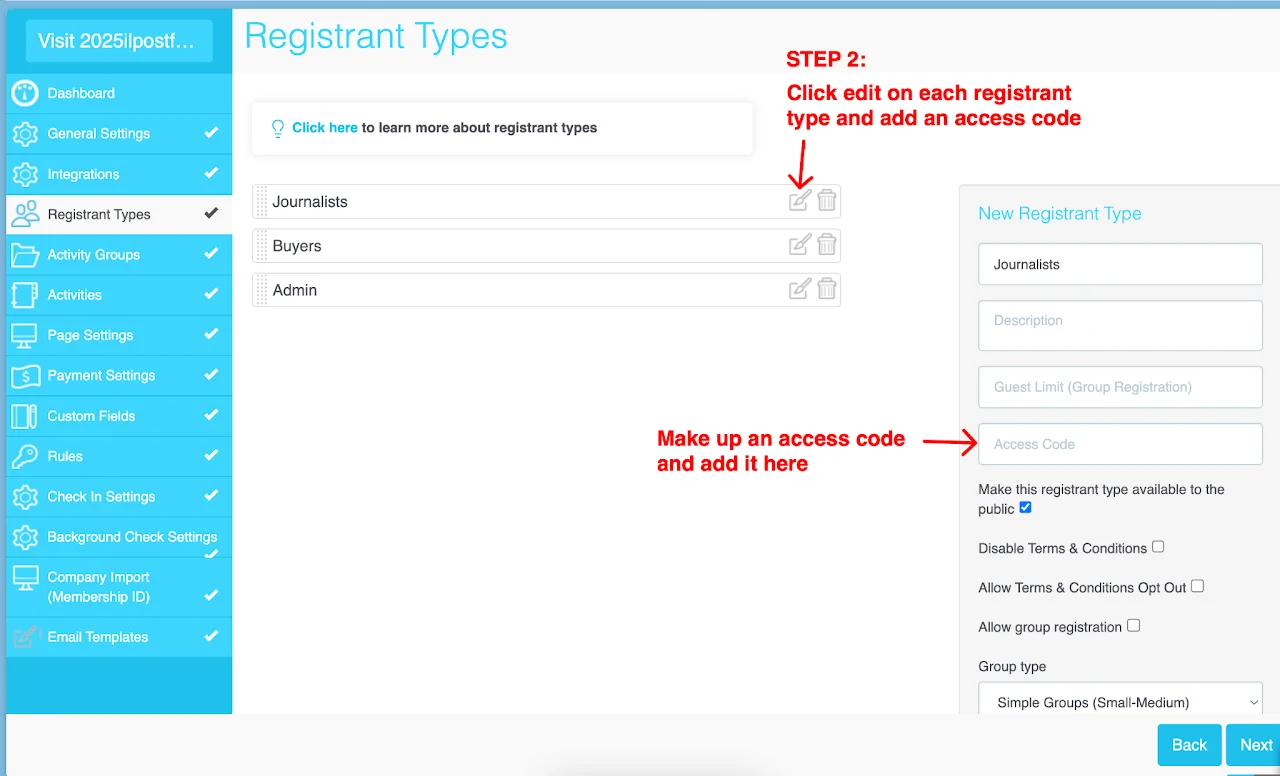
STEP 2: Add an access code
Adding an access code will prevent the public to register. If anyone wants to sign up, they will need to reach out to you.
- Go to
Registrant Typesection - Click the
pen iconto edit a registrant type - Add an access code
- Save the change
If you have multiple registrant types, create access codes for them too (same code for all registrant types is okay too). A combination of letter, number, and symbol is recommended.
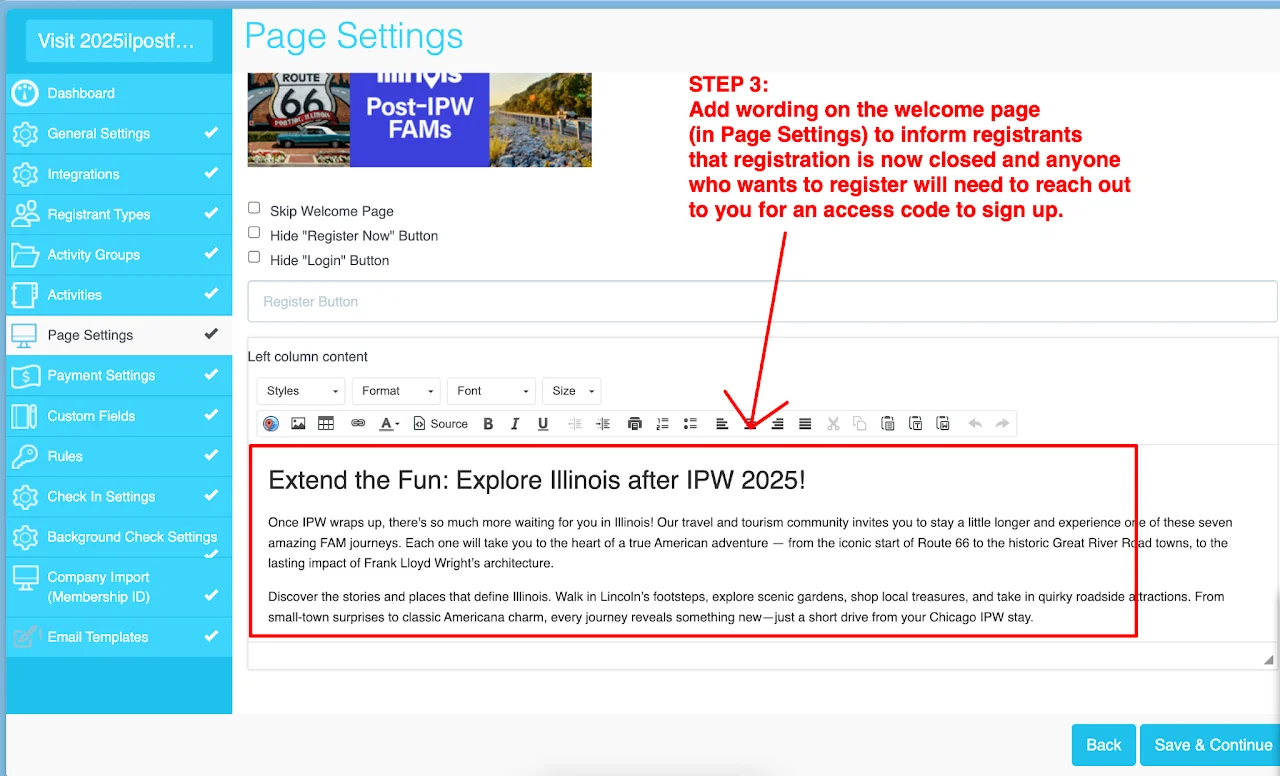
STEP 3: Inform the public
You need to have some wording on the welcome page to inform registrants that:
- Registration is closed after [date]
- If anyone needs to sign up after this date, they need to reach out to you for an access code.
To set up:
- Go to
Page Settingssection > Welcome Page tab - Add wording in the
Left column contentbox - Save the change